© Prick 'n Stitch 2020 All Rights Reserved
|
|
|
| |


Threads (1) >>

ALL ABOUT PRICKING & NEEDLES
PREPARING THE PRICKING
- Anchor the design to the card for pricking with 2 fine pins (or needles) - one placed top and bottom, through pricking pattern dots - don't pin anywhere that doesn't show a dot, otherwise you will be left with extra unused holes when the card is finished!!!
- Do your pricking in good light - it's easy to prick off-sides if you can't see well!
- Check that you have pricked all the holes by holding the design and card (gripped together) up to the light - the unpricked holes will show up as much darker. Our translucent pricking mats make this even easier.
- If a pricked hole is badly off line and there is enough room to prick a new hole without straying into the old one, close up the old one by rubbing with the flat of your nail on the WRONG side of the card.
- If you should tear through a hole by mistake, remove the thread, rub gently as above and place a tiny square of masking tape over the back, then gently re-stitch, being careful not to pull the thread too roughly.
NEEDLES AND THREADS
- The needle provided with the Starter Kit is a Size 10 Crewel - you may find it awkward to thread, but this size was chosen for a reason - it grips the thread gently, so the thread is less likely to slip out and doesn’t leave too large a hole. Nibble the tip of the thread between your front teeth to flatten it and you will find it goes through easier.
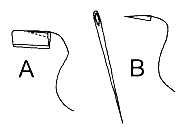
- Threading multi strand threads (see below): Using a tiny piece of masking tape, lay the thread onto the tape, fold and squeeze closed. Trim to a tiny arrowhead and flatten - this will go through the needle with no trouble. Cut off the arrowhead before stitching.
- Don't pull the needle more than about 10 cms onto the thread when using metallic threads as the spot where it bends will sometimes develop an exposed section which shows when you use the last bit of thread.